Translate

Saturday, August 22, 2020

Week of 8/22/20 cards


FS706 - This weeks incredibly talented Featured Stamper, Elizabeth, better known around here as palparis. I am always amazed at her cards and she is the queen of making more than one card for many occasions. Congratulations Elizabeth, I love your gallery.

I found this cute CARD.

I loved how she stamped the daisy several times across the bottom.

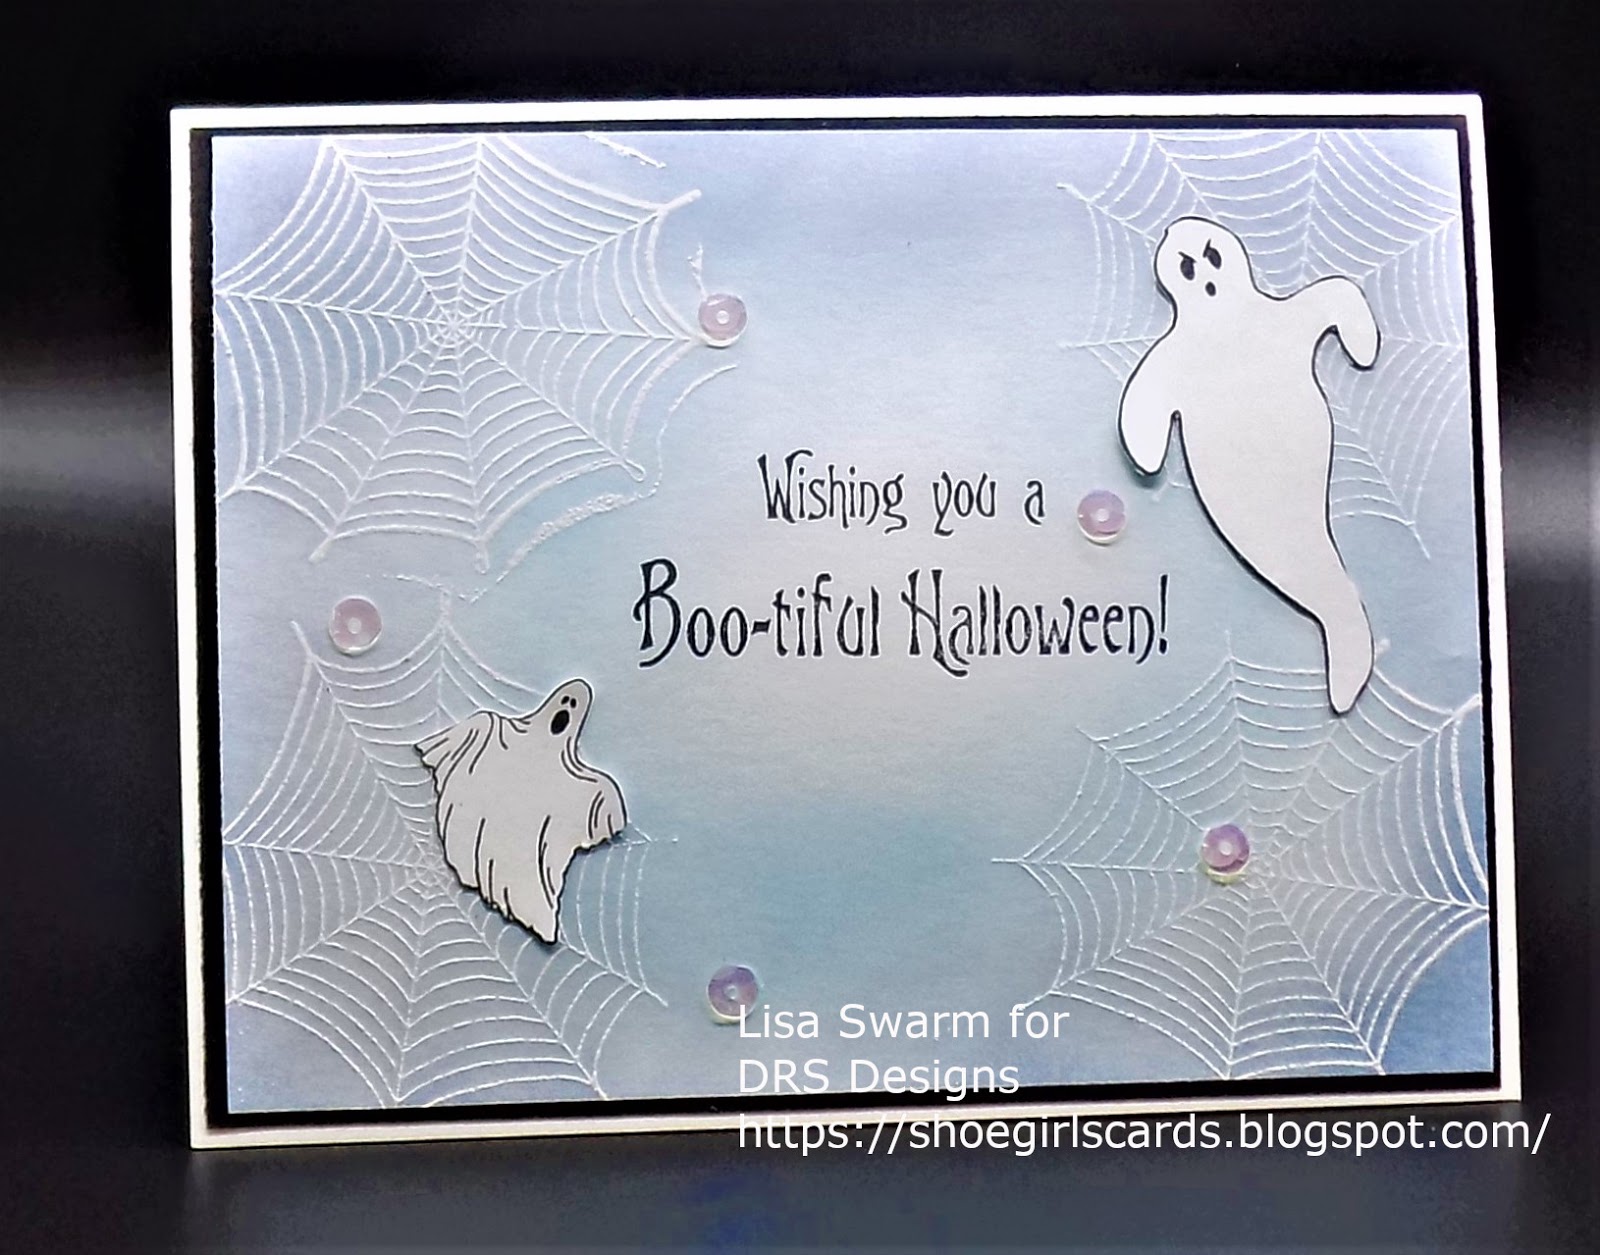
Rather than a Daisy I used this cute brook from DRS Designs and stamped it several times then colored it with copics. I cut the layers down and added this fantastic sentiment.

If the Shoe Fits...


CAS599 - make a card with something that makes you smile. For me it is my family and this card is for my hubby for our anniversary.

I stamped the lips with versamark and added red embossing powder to them. Next I added the mole and finished with the sentiment.

On the inside it says "Today and Forever".

This is the best sentiment for my hubby for our anniversary.

There are 2 Times...


MMTPT630 - Dig Deep!

USEIT2020 - This teapot and cup were in my tote of items to get used up this year. The Teaser Teapot was blue and reminded me of this teapot in my tote to get used.

Stamped the sentiment and punched out a small tag.

Cut the paper layers and added ribbon. Popped the teapot and cup layer up om dimensionals and tucked the tag under the teapot.

Blue Teapot


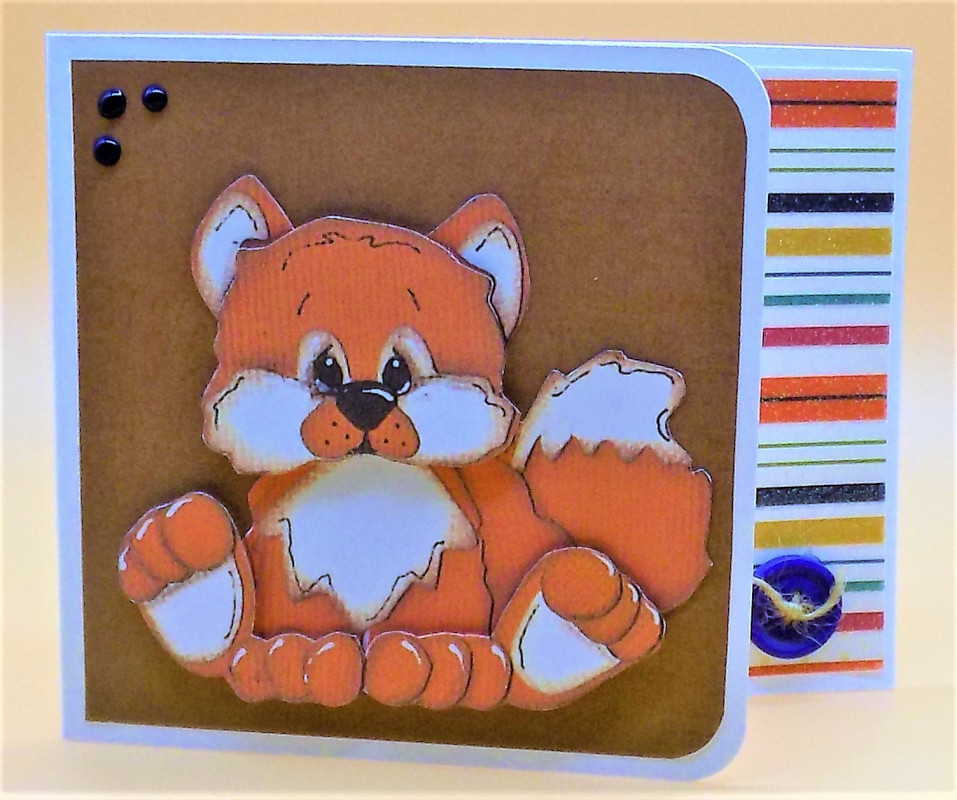
WT806 - Corner Rounder

USEIT2020 - Fox

Super quick card trying to use up this fox image from my tote of items. I cut the end off the 4.25 x 5.5 card base and added DP to the end. On the top I added a layer of kraft paper and rounded the corners of the base and the kraft layer.

I added the fox from my tote and finished with nuvo drops, a button and bakers twine.

Foxy


IC788 - Chairish Pinterest Board where I found this great Image

USEIT2020 - Butterfly

I am trying to use up the items in a tote on my table and when I saw today's inspiration I loved the single butterfly.

Miss You


Saturday, August 15, 2020

Week of 8/15/20 Cards

FS705 - the amazingly talented Featured Stamper is Kelly (sunstamper). Her gallery is full of wonderful inspiration. I found this CARD and immediately thought of a tic tac toe board.

Many years ago when my son was little my mother in law use to send him cards and letters that included fun things for him to play with. This would have been something she would have put together for mailing to him.

I stamped the images on green and orange paper and die cut them. Then I used Chip board in the middle pieces to add some strength to them and layered the greens and oranges on the bottom. I cut strips of black paper and created the tic tac toe board and stamped the sentiment.

I attached the pieces with tape runner so they can easily come off the card to play a game.


Ghouls Just Wanna Have Fun!

CAS598 - Balloons

Die cut the congratulations and numbers. Embossed the white card base and added bakers twine to the balloons.

Finished off with some sequins.


Congrats 2020


MMTPT629 - CHEER

C - Chartreuse, Carrot
H - Hare
E - Embellishments
R - Rust, Rose Pink

This image was sent to me in a Teapot Tuesday exchange. I colored it with pencils and cut the layers. The Hello die was also sent to me in an exchange and it was white. I used a copic to color it pink to match the card.

Hello Bunny

WT805 - Cling Wrap

I used the cling wrap technique for the rainbow background. I put rainbow colors on the cling wrap and spritzed water then added the watercolor paper to soak up the colors.

Once dry I stamped the paw prints and sentiment and finished with a die cut dog on dimensionals.

Rainbow Bridge

F4A547 - You've got a friend

This Billiard table was hand drawn by me then I uploaded it and digitized it so I can use it again in the future,

This is going to my "little brother". My brother has been best friends with his friend James for so long that I now call James my little brother. Even when talking to my family I will say our little brother and everyone knows I mean James.

I drew the image then uploaded it and cleaned it up on my computer creating a digital image. Printed it out and colored with copics.

Next I cut the layers and stamped the birthday sentiment using the DRS Designs birthday sentiment.

Hand Drawn Birthday

 IC767 - Garden Fence Inspiration where I found this cute Fence


USEIT2020 - When I saw the inspiration I found I still have this Heartfelt Creations card kit that I need to use up. They came stamped and cut and I just needed to color, shape and layer.

Colored the flowers, leaves and flamingos. Shaped and sponged the layers. Glued and added dimensionals. Finished with stickles.

Saturday, August 8, 2020

Week of 8/8/20 Cards


FS704 - the incredibly talented Lisa Foster (lisa foster) is this weeks Featured Stamper. I have been a huge fan of her incredible talented for a very long time. Her gallery will blow you away.

I found this adorable Card and was inspired by the webs and the small spider on the green DP. It was a super subtle detail but one that she is great at making sure is just right on all of her cards.

I stamped the two spider webs on opposite corners and heat embossed them in white. Then I sponged purple over the webs.

Next I then stamped the Happy Halloween sentiment and stamped the spider 3 times and then hand drew lines down to the spiders from the sentiment.

Halloween Spiders

CAS597 - Speech Bubbles

When I saw this dog I immediately thought he was looking to eat what is on a table. This makes a great image for the pet shop that I love donating my cards.

Stamped this image and fussy cut the feet and popped up on dimensionals. Stamped the birthday sentiment and die cut the speech bubble popping it up on dimensionals.

Got Cake?

MMTPT628 - Silly animal, flower & Purple

This bunny was a RAK sent to me and I thought it was about time to color him up.

Colored the bunny with copics. Cut down the DP layers and layered. Stamped the sentiment and added it behind the bunny.

Hello Rabbit

WT804 - Inside Out

The moment I found that this step die cut was available I ordered it. I have wanted to make a step card for a graduation card and Yeah the die cut came out.

This is probably the first die cut that when it arrived I had it on the craft table making a card.

Cut the layers for the step card from Divinity Designs and assembled. Die cut the sentiment and numbers and added to the inside.

On the outside I embossed the graduation caps and die cut the graduates. I finished off with the congratulations die cut and a couple of graduation sticker embellishments.

2020 Grad

MIX393 How Does Your Garden Grow

USEIT2020 - HFC card kit

My garden has a rose bed with 3 different color roses. I love the roses from Heartfelt Creations and make them often. This is one of the old card kits and I am trying to get them all put together and used up off my shelf since they no longer sell them.

Sponged color on the layers and flowers and leaves. Shaped the flowers and leaves and layered. Popped the panels on dimensionals and added the flowers. Finished with stickles and pearls.

Roses

IC766 - Allen Designs where I found this fun Clock

USEIT2020 - Heartfelt Creations card kit

The clock reminded me of this fun set from Heartfelt Creations. I had this in the stack of kits I am trying to use up and it was perfect for the inspiration.

Colored the images with copics and sponged the edges of the layers. Added dimensionals and layered the papers. finished with stickles.

Saturday, August 1, 2020

Week of 8/1/20 Cards


FS703 - the incredibly talented featured stamper is Debby Hughes aka limedoodle. I found this cute CARD.

I took inspiration from her two bees but used 2 ghosts instead. For my background I used spider webs and did an emboss resist and sponged blue ink over it. I stamped the sentiment in the center and added sequins as Debby added sequins on her card.

Wishing You...
 No challenge for this card.

This is headed to a dear sweet friend that just lost her only child to a drunk driver. I am heart broken and have no words.

Please if you need a ride know that there are so many that will gladly come to your aid. I beg of you reach out for that ride.

Rest in peace sweet Taylor. You are missed.

DO NOT DRINK AND DRIVE!!!!

CAS596 - Pool Party (something associated with a pool party, toys, colors, drinks)

Stamped the house mouse image and colored with copics. Did the out of the box cutting for the top of the image and sponged the sun on the base layer.

Finished with the birthday sentiment banner.

Pool Birthday

MMTPT627 - water park activities on our cards or just water activities or even park activities

Stamped the fun image and colored with copics. Sponged the sun and layered.

Ladies Day Out
 WT803 - postage

Stamped the Unity frog image and colored with copics. Stamped the sentiment and postage and cut the layers and assembled.

IC765 - Miss Vogues where I found this fun Shirt

F4A545 - It's my birthday (soon)

USEIT2020 - Kitty Patch

I used the fish stamp and stamped a strip for the card. Using yesterday's challenge I added a birthday sentiment.

Going through my tote I found this kitty patch perfect for a black and white card to match the shirt colors.

Birthday Kitty

Saturday, July 25, 2020

Week of 7/25/20 Cards


FS702 - Today's incredibly gifted Featured Stamper is Debra, better know around here as derck. She has an amazing gallery full of inspiration. I found this cute CARD and was drawn to the row of dresses.

I used a row of graduates that are wearing caps and gowns. I die cut the tops of each of the cards so the graduates would hang off the top of the cards. Then I die cut the congratulations sentiment.

On the front card I die cut a diploma scroll and sponged purple.

On the back card I layered a white layer and embossed it.

Congrats Grad
 CAS595 - sky/something in sky related stamp

My MIL needed an African inspired birthday card and I thought this Tim Holtz set was perfect.

I masked the strip on the card and added a white circle. Next I stamped the tree, giraffe, grass and birds.

I Sponged orange and yellows on the strip and then removed the circle mask and added some yellow and light orange to the sun.

I finished the card off with the birthday sentiment.

African Birthday
 MMTPT626 - ribbon and washi

Used another sheet of the Asian wrapping paper my MIL gave me. I am slowly working my way through that stack of paper trying to use it up.

Stamped the sentiment and die cut. Cut the paper layers and added flowers from my stash. Popped the sentiment up on dimensionals. The lace is actually a tape lace.

Thinking of You
 WT802 - What's Your Type? (found I don't own a type writer image so I went with a large sentiment that was in my tote to get used from my friend Jan-Precious Kitty)

USEIT2020 - Bees & Sentiments

These sentiments and bees were in my tote of items and needing used up.

I die cut the sentiment layers and popped the sentiments up on dimensionals. Cut the other layers and added to card base and added the bees and ribbon.

I finished the bees off with stickles on the wings.

Just Bee Yourself
F4A544 - High Fashion

USEIT2020 - Chipboard Anchor

My aunt and SIL both loved a baby girl bottom I did a few months back but both needed a boy card and asked if I could make a boy version. Oh course. :0

I die cut the oval card base then die cut the peach color then the blue color. I sponged waves on the blue and used some chip board anchors to decorate the diaper cover.

I used my cricut to cut the feet and popped them on dimensionals after adding some light pink sponging around them.

Diaper Cover

IC764 - Hygge & West where I found the Banner Image looked like tassels

USEIT2020 - Bag of sequins

When I saw the removeable wallpaper it reminded me of tassels. I needed a graduation card for my nieces sister who just graduated from college. Her colors are gold, blue and white and the image had blue and white tassels.

I have a large bag of shaker elements (many different sequins) that I need to get used up out of my tote. I thought a shaker card was perfect for the card.

I die cut the graduates and created the shaker card. I put the gold layer on the base and then added the graduates on top.

Finished with the congratulations banner.

Congratulations

Saturday, July 18, 2020

Week of 7/18/20 cards


FS701 - this weeks amazingly talented Featured Stamper is Karen (karensallen). I found this super fun Card

Rather than a Halloween theme I went with a Father's Day theme. I put the sentiment in a smoke bubble rather than the moon and used this fun digi for the main image. I added the fence behind him by masking him then stamping the fence.

The entire scene was colored with copics and then I sponged the sky.

Father's Day Grill
 FS701 - this weeks amazingly talented Featured Stamper is Karen (karensallen). I found this super fun Card

Rather than a Halloween theme I went with a Father's Day theme. I put the sentiment in a smoke bubble rather than the moon and used this fun digi for the main image. I added the fence behind him by masking him then stamping the fence.

I colored the image, fence and sentiment with copics and then I sponged the sky and sponged the grass.

2nd Father's Day Grill

 CAS594 - Cloudy Days

Stamped the Cascading cascading fuchsia from Heartfelt Creations and colored with grey copics. Stamped the sentiment and finished with pearls.

Celebrate
 MMTPT625 - parachute, hot air balloon, a banner, rope, maybe some type of nylon ribbon or fibers (banners and ribbons have both been known to use nylon so I used both on my card - note none of my actual pieces are nylon but I am not sure i could find any actual nylon in my craft room)

Stamped the image and colored with copics. Die cut the banner and stamped the sentiment. Added cheese cloth and ribbon and finished with some punched hearts.

Birthday Wishes
 CC800 - This weeks color challenge

CC752 - I used the colors for CC752 they are all in the sweater yarn that I used and on the front card I added more blue and on the back card I used more pink creating 2 cards for babies.

USEIT2020 - Sweaters

The little sweaters were knitted by my great aunt and in my tote of items to use up. I added some cute DP that had bath tubs and 2 of the 3 colors and finished with a square doily, ribbon and flowers.

Babies
 SC810 - This weeks sketch challenge

I took one liberty with this weeks sketch extending the lines down rather than cutting them off. I hope the challenge police do not chase after me. I created another graduation card as my son has more parties to attend and needs a few more cards.

I stamped the sentiment and colored with copics. Used a brick emboss folder as the kids in the band have a story about bricks that will be with them forever that the band director tells every year. I added ribbons and finished with some black stars.

Congratulations
 WT801 - Bridge Fold Card

I have wanted to try the Bridge Fold card for a while and thought it would make a great graduation card.

I cut the graduates with my Cricuit. Then I heat embossed the sentiment.

I created the bridge fold card and finished with some fun stickers. This is one of many graduation cards that my son is giving out to his many friends that graduated this year.

This is the Beginning
 F4A543 - Make It Country

Stamped this great image from Unity on kraft and stamped the sentiment. Cut the banner and die cut the panel and added some DP behind the image.

Country Birthday
MIX390 - Do More of What Makes You Happy

USEIT2020 - Heartfelt Creations card kit

I don't get enough time to create my Heartfelt Creations flowers but when I do they really make me happy.

This is one of their old card kits that I am trying to get used up. I have all the stamps and dies but the kits seem to be sitting on a shelf taking up space so I am pushing myself to get them used.

Sponged the layers and sponged the vase, flowers and leaves. Shaped the pieces and pupped up on dimensionals.

Finished the flower and leaves off with stickles.

For My Friend
IC763 - Fine Gardens where I found this great IMAGE

When I saw the inspiration photo I was drawn to the hanging skeleton in the tree. It reminded me of this great new image from DRS Design.

I stamped half the tree on the left side of the card base and then stamped the other half on the right side of the card base. Next I stamped the sentiment in the center and then I used light purple in the center and dark purple around the outside.

Wishing You...